Deck building is an art that develops through experience and play. It’s also a process that should be carefully tailored to your own play style and group.
Consult with your local building department to determine the specific requirements for your project. Learn the terminology: rise and run, joists and rim joists, decking, support posts, railings, and more. Contact Charleston Deck Crafters for professional help.
Posts and beams are large pieces of timber used to support a building’s structure. They are typically placed eight feet apart with horizontal beams across them to form a framework. They can be constructed using both wood and steel, depending on the type of structure and the preferences of the homeowner. Post and beam construction has become a popular choice for homes because of the flexibility and openness it offers. It allows for huge expanses of glass and high-vaulted ceilings. It also reduces the need for load-bearing walls, which can save on materials and energy.
The difference between a timber frame and a post and beam home can seem subtle, but it is important to understand the differences in order to make an informed decision about your project. The biggest distinction is the way that the timbers are connected together. A true Timber Frame uses precisely cut and fitted mortise and tenon joinery, secured with wooden pegs, while Post and Beam construction often uses metal fasteners.
Both types of construction methods have their own unique benefits, but the one that stands out most to many people is the beauty and authenticity that comes with a true timber frame home. The innate warmth of natural wood is a very appealing feature, and the airy interior spaces created by exposed timbers have an aesthetic appeal that is hard to replicate with a more traditional building style.
In addition, timber frames can be constructed quickly and easily because they do not need to rely on load-bearing walls. This allows for a more flexible floor plan, and it can be easier to accommodate unique design elements like skylights, arched openings and even horse stalls.
The use of post and beam construction can also have an environmental benefit, especially if you choose a local supplier of lumber. Everhart Lumber Company, for example, offers a number of native hardwoods, including American Walnut, Red Oak, White Oak, Yellow Poplar and Eastern Hemlock. They take a while to mature, but when harvested properly and kiln-dried, these woods are strong, durable and long lasting. This means that a true timber frame home will last for centuries, and it can still stand up to the occasional foundation shift or earthquake without losing structural integrity.
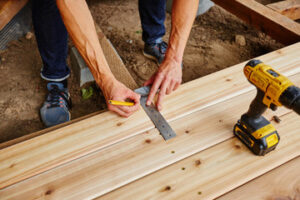
Joists
Deck joists are the horizontal supports that run between the vertical posts and beams that make up your deck’s frame. They are essential to the structure of your deck and help ensure that it won’t crumble under the weight and pressure of users. Joists are typically made of pressure-treated lumber, though they can also be constructed from other materials such as engineered wood or steel. They are also subject to local building codes and must meet specific joist span requirements.
When building a deck, you’ll want to use a joist span calculator. This will allow you to input all of your planned deck’s features into a database and provide a report on the recommended joist size for your project. The load you’ll be placing on your deck will play a significant role in the joists you need to choose. Heavier and sturdier deck materials require closer joist spacing to distribute the load better, while lighter material can be supported by joists that are further apart.
The type of wood you choose for your joists will affect the overall look and durability of your deck. Pressure-treated lumber is the most popular choice for its cost efficiency and tensile strength. However, if you’re looking for a more natural appearance, you can opt for cedar or redwood. The type of wood you choose will also impact how fast your deck can be built.
Another important component of a deck is the joist hanger. These are pieces of hardware that connect joists to the ledger board. They’re typically used when the deck is being attached to the house and must be properly installed in order to handle the expected load.
Some decks are framed with sagging crossbeams or flush beams. Sagging crossbeams are placed below the joists, while flush beams sit at the same height as the joists. You can also opt for a cantilever style deck, which allows the ends of the floor joists to extend out past their support members.
To avoid water damage to your deck’s framing, you’ll need to install a flashing system. This will prevent moisture from seeping in through the end of your joists and damaging them over time. In addition, you’ll want to tape your joists in a process known as tapping deck joists. This process involves applying a special waterproof tape to the top of each deck joist. There are several different types of joist tape available, but it’s generally a good idea to use a self-adhesive option such as Trex Protect. This type of tape will last longer than asphalt tape, which is more likely to break down over time.
Deck Footings
Footings are concrete columns below grade that support the deck’s posts and, in turn, the joists. They are required for most decks and vary according to code requirements. Most are “dropped,” meaning they sit below the deck framing so that the joists cantilever beyond them by a couple of feet, but some are set at ground level. Some have a post in the middle that supports the beam, while others are “flush,” meaning they rest directly on the beam.
There are several kinds of deck footings: concrete piers, concrete blocks, and screw piles. Piers are more expensive than other types, but they are the fastest to install because there is no waiting time while concrete sets. Concrete block footings are a bit quicker than poured foundations because there is no concrete pouring involved, but they may not be suitable for very heavy loads or on sites that experience frost.
For poured concrete footings, the first step is to dig a hole for each of the deck’s posts. The hole must be dug to the proper depth, which depends on where in the country you live and how much weight the deck will support. You must also consider the local frost line, which is the depth below which soil freezes and thaws. Digging to this depth will prevent frost heave, which can cause the deck to shift and possibly collapse.
Once the holes are dug, concrete is poured into them and saddle brackets are cast into the wet concrete to become the deck’s anchor points. This process is labor intensive and requires a certain amount of weather-depending wait time. In contrast, installing deck pier blocks requires no digging and can be done at any time of year as long as the ground isn’t saturated.
To start, use a 2×8 ledger board to mark the location of the first deck footing. Using a perpendicular string, make a ”x” on the ground to mark the spot where you want the first footing. Having the ledger in place helps you visualize the spacing of joists and keep the deck frame square and plumb. When locating subsequent footing locations, it’s a good idea to avoid math by measuring off the center of each previous footing location on the stringline, rather than adding the post spaces together. Alternatively, you could use a spray paint in bright colors that will stand out against the dirt and help you make sure the lines remain straight and accurate.
Railing
Adding a railing to a deck is not only a safety feature, but also gives the deck a finished look. It’s not as complicated as it may seem, and you can do it yourself if you have basic carpentry skills. It’s important to consult your local planning and building department first, however, to see if you need any permits or have other building requirements that you must meet.
Building a deck involves several steps, including laying out the footings and constructing the joists. The footings, made of concrete, provide stability and support for the structure. The concrete should be poured below the frost line, which helps prevent heaving of the deck during winter months.
When building a deck, it’s a good idea to use pressure-treated lumber or other preservative-treated wood to reduce the risk of insect infestation and rot. Hardwoods like cedar, ipe and redwood are more expensive but offer long-term durability. They are resistant to rot, bugs, splintering and weather damage.
After you’ve set the posts for your deck, you can begin construction on the railings. April recommends starting with the bottom rail, which should be set up as a 2×6 run. The top rail should be a 2×4. If you choose to add a baluster system, now is the time to do it. You’ll need balusters, which are spaced at regular intervals, and the height of the balusters will determine how high your top rail will be.
Before you fasten the balusters, mark off their locations. The spaces between each baluster should not exceed 4 inches, as per building codes. Then, drill holes for the lag screws, plus counterbores to sink the heads of the lag bolts, and screw them in place.
Now you can install the rail cap, which is the top part of the 4×4. Nail it in place with 8d threaded nails or deck screws. Lastly, install the balusters between the posts and the rail caps. You can space them evenly or create a pattern of your own. This is the last step of building a deck, and it’s a great way to enjoy your new backyard living space.